OPERATING
PROCEDURE
The 9 volt battery
should already be installed
1. Extend electrode pair to either the 90░ or 180░ measurement
position.
2. Remove the electrode covers as described in ôSetting Up the
Electrodesö section.
3. Turn on the instrument by pressing the ON/OFF switch
once.
ôû1ö and the unit of measure will momentarily appear and then a
second number with the unit of measure is displayed. The display should
show which parameter is being measured (for example, pH, ╡S (micro-siemens),
or ╡S x 10. Only the 200K range utilizes the x10 annunciator on the TDS-4.
20K and 2K are direct readings.
Overrange conductivity is indicated by "1" on the display.
4. Calibrate the meter before using the instrument. Refer to the
previous section.
5. Immerse electrodes in solution to be measured. For proper operation,
immerse electrodes to half their length.
6. Agitate electrodes briefly (to mix the sample) and observe the
reading.
7. To change parameters, press the pH/╡S switch one time. The range
sequence on the TDS-4 is pH-200K-20K-2K.
8. Rinse the electrodes thoroughly and replace pH soaker bottle
and conductivity cover before folding into storage compartment (at the
back); fill the bottle with a small amount of pH4 buffer or pH7 buffer.
9. Remove the battery when the instrument is to be stored for a
long period of time.
pH ELECTRODE CARE
pH Electrodes must be kept moist. The pH electrode was shipped stored
in a soaker storage bottle. The storage solution contained in the bottle
is a potassium chloride solution. Do not be alarmed if white crystals
form at the end of the electrode. It is simply potassium chloride.
Rinse with distilled water to dissolve the crystals before using the electrode.
For storage, place the electrode back in the soaker bottle. If
the potassium chloride solution evaporates or is lost, simply use pH buffer
4.0 or pH buffer 7.0 supplied for storage. DO NOT use distilled or deionized
water as this will drastically reduce the electrode lifespan.
If the pH electrode should dry out, soak the electrode up to 2 hours in
pH buffer 4.0 solution. If the electrode is left dry from an extended
period of time, permanent damage will result.
pH
ELECTRODE REPLACEMENT
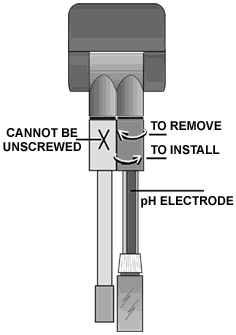
pH Electrode Replacement The pH electrode can be replaced with
the replacement electrode available from NEWPORT Engineering
(part number PHE-8200). To remove the electrode, simply unscrew
it clockwise from the electrode pivot hinge on the meter. You
will hear a pop; thatÆs OK. Refer to Figure 4.
To install a new electrode, attach
the connector ends and screw counter-clockwise or to the right
until you have a good connection.
Figure
4 (on right)
How to Unscrew the pH Electrode
|
|
CONDUCTIVITY
ELECTRODE CARE
The conductivity electrode needs to be kept clean and free of deposits
and other types of build-up. Use the detergent powder supplied in the
plastic bag for cleaning the electrode.
1. Mix a convenient amount of cleaning solution using the detergent
powder. Use a mixing ratio that is 30 grams of powder to 4 liters of water
(the bag contains 30 grams).
2. Dip the brush into the cleaning solution.
3. Insert the brush into the conductivity electrode approximately
1 1/2" taking care to clean both conductance rings. One ring is located
at the bottom of the electrode and the other is located approximately
1" up from the bottom, above the blue collar.
4. Twist the brush and scrub up and down for 20 to 30 seconds.
5. Rinse the electrode thoroughly in distilled or deionized water.
6. Clean the brush with tap water and rinse it with distilled or
deionized water after using.
CONDUCTIVITY ELECTRODE REPLACEMENT
THE CONDUCTIVITY ELECTRODE CANNOT BE UNSCREWED (THIS IS THE ELECTRODE
WITH A SMALL HOLE IN THE BLUE CONNECTOR HOUSING). The conductivity
electrode is field replaceable by qualified technicians only. The
part number of the conductivity electrode is CDE-8200. Contact NEWPORTÆs
Engineering Department for instructions on how to replace the electrode.
|